Beginner’s Guide to Minecraft: How to Survive and Thrive
 387
387
 0
0
 August 16, 2023
 Lucid Arthur
Minecraft can be a daunting game. Aside from a nearly endless world to explore, you’ll encounter dozens of deadly enemies, hundreds of craftable items, and several mechanics that are never properly explained through tutorials. If you’re having trouble coming to grips with this open-ended game, here are the things you should do first in Minecraft if you’re looking to survive.
Step One: Build a Crafting Table
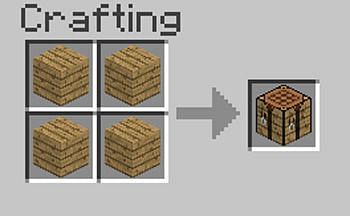
- Find a tree: To create a crafting table, you’ll need four wooden planks, which can be crafted with one block of wood from a tree. Trees are in most areas of Minecraft, so just look around.
- Collect one block of wood: Left-click and hold a block in the tree trunk until it breaks, then walk over the block to pick it up. You don’t need any tools to break wood, though using an axe will expedite the process.
- Open your inventory: Press E to do so. Your inventory window will pop up. If you change the key that you use to open the inventory, press that key instead.
- Select the block of wood: Click the block of wood in your inventory to add it to your mouse pointer, which will allow you to drag the block around your inventory.
- Click one of the crafting section squares: Place your wooden planks into each slot on the 2×2 grid.
- Simply click on the crafting table to drag it into inventory: The backbone of Minecraft can be described as crafting tables.
Step Two: Build Tools
Now that you have a crafting table, you can create a variety of tools, including a wooden pickaxe. These tools will help you with tasks such as mining and farming. To get started, open the crafting screen (either your personal crafting screen or the crafting table screen) and place two wooden planks vertically in the crafting area. This will produce four sticks. Make sure to craft a few of these while keeping some wooden planks on hand.
Next, go to the crafting table’s crafting area and create a T-shape with the sticks positioned vertically and the wooden planks arranged horizontally on top of the sticks (see the screenshot below). This will produce a wooden pickaxe. On console versions, you can do this directly from the menu without having to position the items.
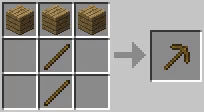
The wooden pickaxe is not very strong, but it’s a start on your journey to building better tools. Begin by digging into a hillside to find some stone, and use your wooden pickaxe to break it up. (If you try to break stone with your bare hands, it will take longer and you won’t get any stone blocks).
Collect the stone blocks and use them at the crafting table to make a stone pickaxe, which has a wooden handle and a stone tip. On consoles, you can select advanced pickaxes like the stone pickaxe by choosing the axe option on the crafting menu and using the left analog stick to scroll through the variations. The stone pickaxe will be your main tool until you can find better materials.
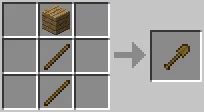
You can also create other tools in a similar way. While the pickaxe is essential for mining, you’ll also need more planks for building, so an axe is useful for quickly gathering materials before nightfall. You may also want to make a shovel (by placing 2 sticks in the middle row from bottom to top and a wooden plank on top) for collecting sand and clay to make glass and bricks, respectively, but these aren’t necessary right away.
Step Three: Build a Shelter to Survive the Night
 At the beginning of the game, unless you’re playing in Peaceful mode, you’ll be very vulnerable. When you hear music start to play, it means that night is approaching, and once the sun sets, monsters such as zombies, creepers, and skeletons will start spawning around you. That’s why it’s important to learn how to build a house in Minecraft.
One of the simplest shelters you can build is by digging into a hillside or the ground. You can collect blocks that you’ve destroyed (or almost any block, really) and use them to build walls around yourself. Try digging a hole into a hillside and then using the dirt blocks you’ve collected to build a wall behind you, blocking yourself in.
This will keep you safe, but you’ll have to wait until morning, which can get boring after a while. While the night passes, you might want to collect resources and mine around your shelter and make more tools. Tomorrow, you can go out and gather more materials.
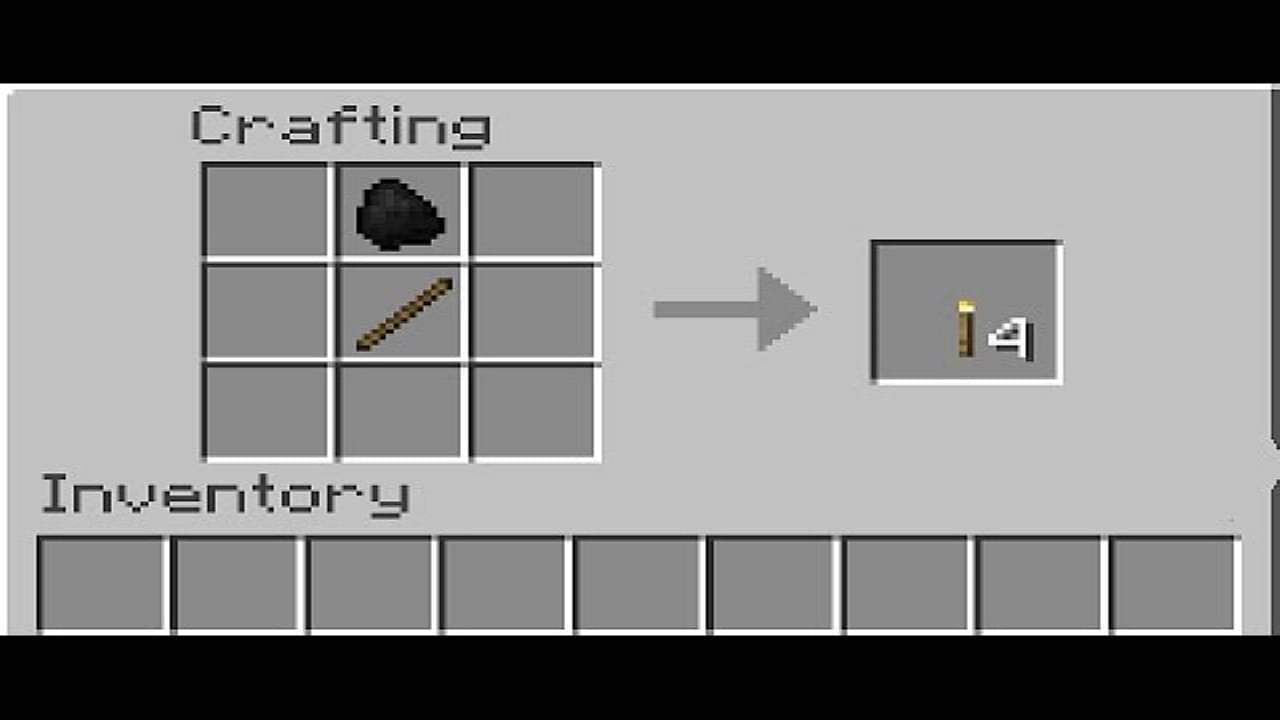
You can also create torches if you’ve found coal. If you haven’t found coal yet, you can make charcoal by placing a solid piece of wood in the top slot of a furnace and any other flammable object (such as a wooden fence post, wooden planks, wooden stairs, or spare wooden tools) in the bottom slot. Then, simply go to your crafting table and place a few pieces of charcoal or coal on top of some sticks to create torches. Torches help light up your house and prevent monsters from spawning inside. They also make it easier to see in caves.
Minecraft Survival houses don’t need to be fancy. Here’s a quick checklist of things your basic home should have:
- BedStorage Chest
- Windows
- Door
- Secure Walls and Ceiling
- Secure Mineshaft for nighttime mining
- Torches
- Furnace
Step Four: Understanding the Hunger Meter and Gathering Food
Now that you have a shelter and tools, the next thing you need to focus on is finding food. As you move around, your hunger meter, represented by chunks of meat on the bottom right of your screen, will start to decrease. When your hunger meter is low, you’ll lose the ability to regenerate health and sprint. To regain these abilities, you’ll need to eat food to replenish your hunger meter.
The difficulty mode you’re playing on will affect how your hunger meter behaves. In Peaceful mode, it won’t decrease over time. In Easy and Normal modes, it will decrease over time, and when it reaches zero, your health will start to drain until it reaches half health on Easy and half a heart on Normal. In Hardcore mode, when your hunger meter reaches zero, your health will continue to drain until you die.
To replenish your hunger meter, you’ll need to eat food. Early on in the game, your main source of food will be animals such as cows, pigs, and chickens. To get their meat, simply kill one of these animals and collect the meat it drops.

You can eat the raw meat to regain some hunger points, but for the full effect, you’ll want to cook it first. This is especially important for chicken because there’s a chance that eating it raw will make you lose even more hunger. To cook the meat, mine some stone and coal. Then, open your crafting table and fill every space except for the center with cobblestone to create a furnace. Place the furnace on the ground.

Put your coal in the bottom slot of the furnace and the food in the top slot. Wait about ten seconds for the food to cook (one piece of coal can cook eight pieces of meat). Once it’s cooked, take it out and eat it to regain more hunger points.
Later on in the game, you can start making farms such as wheat farms or mushroom farms or even melon farms if you find the materials.
There are many recipes you can discover in Minecraft, but for now let’s focus on just surviving. Need some ideas for what to cook? Here’s a list of some of the best foods in Minecraft:
- Bread
- Steak
- Cooked Chicken
- Golden Carrots
- Cooked Cod
- Enchanted Golden Apples
Survived Your First Night? Here’s What to Do Next

After surviving your first night in Minecraft, you can now explore and gather more resources, including food and wool for a bed. A bed is a valuable item because it allows you to sleep through the night, but you’ll need the materials to craft it and a place to put it. It’s possible to find everything you need on your first day, which will be a big help.
To make a bed, you’ll need three blocks of wool (any color), which you can get by shearing a sheep. Killing a sheep will only give you one block of wool (using shears will give you three to four, but you don’t have those yet). Place the three blocks of wool in a horizontal row on your crafting table, with three wooden planks underneath them.
If you want to build a more advanced house than the simple shelter you used last night, try this:
- Mark out an area that’s 5×4 blocks and build a wall that’s three blocks high around the perimeter. You can use any material, but bricks are a good choice because they’re stronger than dirt or sand.
- Build a roof or an overhang around the outside to prevent monsters from jumping inside. Place your bed in the middle of this area, not in the corner.
- If you don’t have the time or resources to build a proper shelter, you can make a platform that’s at least three blocks high. This will be too high for enemies to jump onto, and you can rest safely there until morning.
Essential Tips and Tricks for Surviving in Minecraft
- On your first night in Minecraft, you can spend your time digging a small mine shaft beneath your shelter. This will keep you safe from enemies and give you something to do. Remember not to dig straight down, as this could cause you to fall into caves or lava. Instead, dig in a staircase or spiral shape, and always check before stepping forward to avoid losing your gear.
- In addition to using the staircase method, you can also make a 5×5 mineshaft. Once you’ve finished digging a level, you can place stairs or a ladder to get back up. This method also allows you to mine the resources on the sides of the shaft.
- Make sure to leave a trail of blocks or torches so you can find your way back. Another method is to build a large landmark, but this can be time-consuming and may not be visible unless your render distance is set to maximum.

- Before going on long trips, store any valuable materials (such as ore and expensive tools) in a chest. When going into the mines, only bring the essentials: one set of tools, a crafting bench, some food, sticks, torches, and one stack of easily breakable blocks. This way, if you die, you won’t lose any valuable items or materials.
- Start by building small structures before attempting larger projects. This will help you become familiar with the game and the materials available before investing time in a large project that you might later regret.
- Remember to explore the crafting system and discover all the items that can be crafted. There are hundreds of objects to discover, so it’s worth taking the time to learn about them.

- Don’t worry too much about finding a village at first. Villages and villagers become important later on in the game, but for now, focus on gathering resources and learning the basics.
- And of course, make sure to back up your worlds and save files regularly, especially after completing large projects or successful mining trips. It’s always better to be safe than sorry!
- If playing split-screen on consoles, be careful when using guest accounts. Their items and inventory won’t be saved unless they’re placed in a chest. To sign in non-Xbox Live Gold accounts in a local game, uncheck the “online” game option when loading your world.