How to Use the TickingArea Command – Wiki Guide
 155
155
 0
0
 December 4, 2023
This Minecraft tutorial explains how to use the /tickingarea command with screenshots and step-by-step instructions.
You can add up to 10 ticking areas, remove ticking areas, or display your ticking areas using the /tickingarea command in Minecraft. A ticking area is like a spawn chunk in the game. The creation of a ticking area allows you to ensure that areas in the game update even when no players are around, thus ensuring that mobs do not despawn and your crops continue to grow. Let’s explore how to use this cheat (game command).
Requirements
To run game commands in Minecraft, you have to turn cheats on in your world.
TickingArea Command
TickingArea Command in Minecraft Pocket Edition (PE)
In Minecraft Pocket Edition (PE), the /tickingarea command has different syntaxes depending on what you want to do.
To add a ticking area defined by 2 sets of coordinates (opposite corners):
/tickingarea add <from> <to> [name]
To add a ticking area defined by a center coordinate and a radius:
/tickingarea add circle <center> <radius> [name]
To remove a ticking area by position:
/tickingarea remove <position>
To remove a ticking area by name:
/tickingarea remove <name>
To remove all ticking areas:
/tickingarea remove_all
To list the ticking areas:
/tickingarea list [all-dimensions]
Definitions
- from is the starting x y z coordinate for the ticking area (ie: first corner block). Learn about the coordinate system.
- to is the ending x y z coordinate for the ticking area (ie: opposite corner block).
- name is the name assigned to the ticking area.
- center is the x y z coordinate of the center when defining the ticking area using circle.
- radius is the number of chunks away from the center coordinate that defines the circular ticking area. It must be a number between 1 and 4.
- position is the x y z coordinate of the ticking area to remove.
- all-dimensions is optional. It is used to list all of the ticking areas in all dimensions (ie: Overworld, Nether, End). If not specified, it will only list the ticking areas in your current dimension.
TIP: Although the /tickingarea command requires a y-coordinate value, it is actually ignored by the command since all chunks are the entire vertical height of the world (the command automatically defaults the y-coordinate to 0).
For example, a coordinate of
24 75 8will default to24 0 8.
Examples
Example in Pocket Edition (PE)
To add a ticking area called DMCrops defined by the (opposite corner) coordinates (16, 0, 0) and (31, 0, 15) in Minecraft PE:
/tickingarea add 16 0 0 31 0 15 DMCrops
To add a ticking area called DMAnimals defined by the center coordinate (24, 0, 8) and a radius of 4 chunks:
/tickingarea add circle 24 0 8 4 DMAnimals
To remove a ticking area called DMAnimals:
/tickingarea remove DMAnimals
To list the ticking areas in all dimensions (ie: Overworld, Nether, End):
/tickingarea list all-dimensions
How to Enter the Command
1. Open the Chat Window
The easiest way to run a command in Minecraft is within the chat window. The game control to open the chat window depends on the version of Minecraft:
- For Pocket Edition (PE), tap on the chat button
 at the top of the screen.
 - For Xbox One, press the D-Pad (right)
 on the controller.
 - For PS4, press the D-Pad (right) on the controller.
- For Nintendo Switch, press the right arrow button
 on the controller.
 - For Windows 10 Edition, press the T key to open the chat window.
- For Education Edition, press the T key to open the chat window.
2. Type the Command
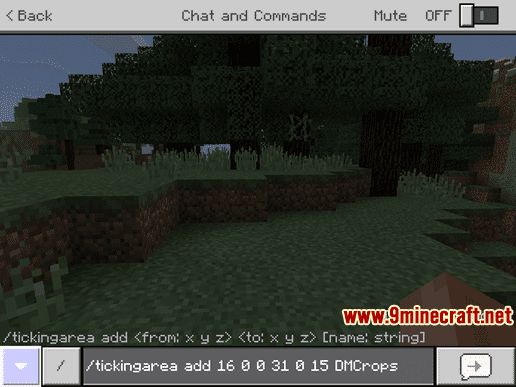
To add a ticking area called DMCrops defined by the (opposite corner) coordinates (16, 0, 0) and (31, 0, 15) in Minecraft PE 1.2:
/tickingarea add 16 0 0 31 0 15 DMCrops
Type the command in the chat window. As you are typing, you will see the command appear in the lower left corner of the game window. Press the Enter key to run the command.
Once the cheat has been entered, the ticking area called DMCrops will be created.
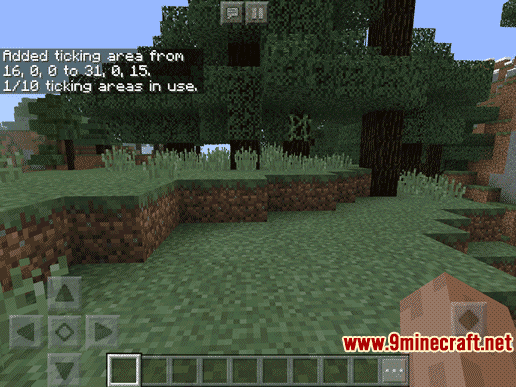
You will see the message “Added ticking area from 16, 0, 0 to 31, 0, 15. 1/10 ticking areas in use.” appear in the top left corner of the game window to indicate that the command has successfully completed. You can create up to 10 ticking areas and this was our first ticking area as denoted by “1/10 ticking areas in use“.
Now your mobs will not despawn and your crops will continue to grow even when you are away exploring other areas of the map.
Congratulations, you have learned how to use the /tickingarea command in Minecraft.