RetextureKing’s Server Creator
RetextureKing’s Server Creator. Many people just can’t seem to make a Minecraft server; Be it the startup script or the port forwarding. Also, having the entire summer to express my programming skills, I decided to make this. Sure, there are other ones out there, but I wanted to make one. This does what the title implies: Makes you a Minecraft server with the click of a few buttons. Please note that this application is in alpha stage and does not yet have features such as a proprieties editor and an external mod loader. These features are planned and will eventually be implemented.
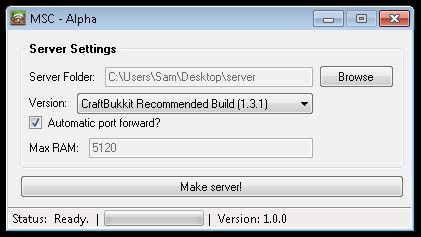
Features:
- Automatic port forwarding – You don’t even need your router credentials!
- Automatic enabling of UPNP – Don’t do any work so my program can port forward for you! It’s all automatic!
- Support for Bukkit, Tekkit, and vanilla Minecraft – Your server, your way.
- Automatic updates – When I release the latest and greatest updates, you get them also.
- Fluid and easy to use – Never make a server manually again!
Notes:
- Make sure ALL instances of Java (java.exe, javaw.exe, java *
- 32.exe, etc.) are closed, or you will be stuck with an invisible server running on your computer!
- For the automatic port forwarding to work, UPNP MUST enabled on your router AND your computer.
- This application REQUIRES .NET Framework 4.
- I AM NOT providing help with UPNP. If the portforwarding fails/doesn’t work, just go here to do it manually.
- This made it on the front reel TWICE! Thanks guys!
Enabling UPNP Automatically
Open the application and click “More options… -> Port Forwarding -> Enable UPNP” and say yes to the UAC prompt. The application will say “Done!” within a second after UPNP. has been automatically enabled.
NOTE: Don’t run “EnableUPNP.exe” directly, or it won’t fully enable UPNP. It has to be run through the application.
Enabling UPNP Manually
To enable UPNP on your computer do the following: (NOTE: Enabling it on the router is different for each one, so I can’t help you there.
NOTE 2: You need to be an administrator on the computer to enable UPNP if it hasn’t been enabled already.)
- Click (WINDOWS KEY) + R at the same time on your keyboard.
- In the “Run” dialog, type “services.msc” and click enter.
- If they are not started yet, start “UPnP Device Host” and “SSDP Discovery”.
- Click Start and search for “cmd.exe”. Right click it and select “Run as Administrator”
- Type “netsh firewall set service type = upnp mode = enable” and click enter.
Your done!
Installation:
- Download the ZIP file.
- Extract ALL the files into a folder.
- Run “MSC -Alpha.exe” and update to the latest version.
Important note: Do NOT rename, remove, or edit any files after the extraction. Every file is needed to run the program, and renaming them will cause fatal errors.
RetextureKing’s Server Creator Changelogs:
v1.0.8
- Fixes file generation not working for people with a space in their Windows username.
Get it from:
- Auto updater


